Saturday, February 28, 2009

Boy birthday cards


I spent the morning participating in a spin-a-thon for Lance Armstrong foundation. I lost both my parents to cancer and try to support or participate in any fundraiser that can help end this terrible disease.

I have two cards to share with you- both my sons have birthday parties to attend today. I used the same basic layout, but changed the sport to suit each birthday child's favorite.

I used a retired set- sporting goods. I will never get rid of it as I love the artwork images and it covers almost every sport possible.
I also used my new SU textured plates for my big shot. Love them such a deal at $9.95 for 3 double sided plates. I then used direct to paper method with ink pad to show the textured image more.

I used my watercolor crayons to color in the images that I stamped in black stazon onto confetti white cardstock. I popped the football and basketball up on dimensionals. For final touch I added some brads- I like to add metal embellishments to masculine cards vs. ribbon.

Thursday, February 26, 2009

Getting "Chippy with it"


I had group of "moms" who get together for stamping once a month, we usually make 2 cards and 1 3-D item, but it varies. This is just a class format and the preschool set is welcome to come play while mom's craft.

This month we did projects using chipboard and I can tell you I cased all the ideas! You got to love blog surfing, to get so much inspiration and ideas from others.

The bookmark Tiffany did for her hostess appreciation party and I thought they were genius so I totally copied!


This is a version I saw on splitcoast stampers, I changed the paper and then used new hostess set for center. I am sorry I can't recall who's original layout I cased.
This one I cased one done by Shelley Hopps her blog is Mocha Memories.
I love this one because it has no stamping on it. I used rub ons for sentiment and for the inner part of chipboard frame.


The idea of the class was to show how to use chipboard:
1) can stamp on it
2) color it with ink (here we used craft ink)
3) cover it with designer or regular paper
I used glue dots or dimensionals to attach it to card stock to hold the weight.

Tuesday, February 24, 2009

BIA Birthday card organizer


I wanted to do a project to play with my bind-it -all. SCS has a great tutorial by Beate here.
This was a super quick project, as I just did some fast back ground stamping to see what I would come up with... I am going to offer this as a class for my customers for $15 which will include making 4 birthday cards in April. This will make a great gift or for your own personal use. If anyone is like me and need to write things down now-a-days.... The memory is not what it use to be. Great to have a place to write birthdays you need to remember each month and a place to store them!

Sunday, February 22, 2009

Back with some cards


We got back from our Mystery vacation trip yesterday, and then I did a "stampin birthday party" for an 8 year old. So, sorry I have not caught up on my blog roll friends.


My husband took us to Six Flags great escape indoor water park in Queensbury, NY. It was a nice break!


I do have some cards to share with you. This one is case of a card I saw SCS by Dawn. I changed it up a little bit, but loved how she cut out flowers in 2 layers to make them 3-D. I will be sending these out for some customer order Thank you(s).


Unfortunately, I also found out about another loss of a friend to breast cancer at age of 53 this week. I decided to pull out my thoughts and prayers stamp set and come up with a card. I used my mellow moss and chocolate chip markers. As it was a new stamp- I needed to rub it on my pants to have it take ink. Not all stamps need this trick, but it does work. I used my top note die in the big shot and then used a jumbo eyelet, CAD and soem grosgrain ribbon to match.

Thursday, February 19, 2009

BEE finished!


This is the finished card from WWC tutorial. My downline Robin came over to learn some new techniques and we played with this set- so I finished the card! I but the bees on dimensionals, and used white gel pen on background flowers.
Off on a mystery vacation for a few days- I will let you know where we end up! Enjoy yours :}

Wednesday, February 18, 2009

watercolor wonder crayons tutorial-part 2

Part 2- wwc tutorial.
You can also use wwc to color line images.

Materials needed:

  • waterproof ink- I used stazon black


  • water color brush and water- I am using aquapainter from SU as it has well reserve for water, so I don't need to keep dipping my brush


  • water color paper- I am using SU's watercolor paper that is 140 lb weight. You can buy cheaper to play around with getting use to color, but the better the weight the more water it will hold and not pill on you.


  • paper towel- to wipe off excess water

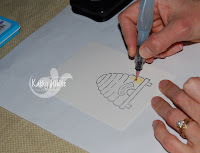
step 1: stamp you image in permanent ink color. This just buzzin by from Spring Summer SU catalog.


step 2: There are two methods with wwc to add color.
1) you can color directly to image with watercolor crayon and then blend color with aquapainter
2) you can pick up color from wwc crayon aquapainter. tip- pick up from the bottom to keep your tip in good shape.


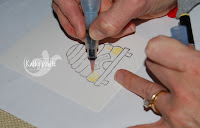
For demo purposes the right side of hive I will color in with crayon and left side I will pick up from bottom and color hive.

step 3: blend your color with aquapainter, you want it to be wet but not saturated, so use paper towel to wipe off excess water. You can also take color out if it is to dark for you, with just a wet brush.


step 4: shading- you need to think about which way light will be hitting your image. The shade side will be darker. You can do that by letting it dry and darkening with same color or in this case I used a darker shade. I started with so saffron crayon and then added more mustard to shade it. You will also want to leave some white area for highlight. I used close to cocoa and chocolate chip for wood and bordering blue for "hive sweet hive".


Step 5- optional you can give a background to your image with wwc too. I am just scribbling with ballet blue for the sky all over watercolor paper and then I am blending with aquapainter.


Stay tuned for tomorrow when I make a card of this!

Monday, February 16, 2009

watercolor wonder crayons tutorial-part 1

Some of my customers have asked about using watercolor wonder crayons.

This is technique shows coloring directly on stamp with wwc.
1. scribble directly onto stamp with wwc, solid images work best with this method.


2. Lightly mist with a spray bottle filled with water. This takes some trial and error, but I find about 6 inches away works best. The other method is to spray directly onto stamp first and then color onto stamp- this gives a more muted look. (sorry for fuzzy photo, my 11 DS took photos for me)


3. Stamp your image onto good quality water color paper. You need one with good thickness and weight. Stampin Up's is 140 lb weight and holds up to a lot of water without breaking down. If you use a cheaper water color paper, your results will not be as good.


4. This is the image on paper with spraying the stamp at a distant, using regal rose wwc, you can still see the wetness. The final product I wet the stamp first and then scribbled on for the rose red flower.
5. Finish your card. This is botantical blooms (SAB set you can earn when you spend $50). It is a two step stamp set, I did an overlay with always artichoke classic ink. The sketch was last weeks sketch challenge on SCS.

Sunday, February 15, 2009

last Valentine and award

Are you sick of Valentine's yet? As card makers the holidays are all about the cards, but you get inundated with too much and then you become sick of them.

Anyways, my DH asked me to make a card for his mother. I used a sketch from SCS 2 weeks ago that I never got too and some scraps I had.

stamps: polka dot punches (SAB)

paper: prints pack (hostess), PIP

ink: white craft, then used clear embossing powder

accessories: stylized hardware, large heart punch, red grosgrain, designer label punch.

* I did not have valentine or love you sentiment to fit inside designer label punch, so I just cut the words of and attached.


Christina, gave me this award. The rules that go along with the award are to say one thing nice about your husband and then 6 best things in your life.
My husband although at times makes me want to pull my hair out after almost 14 years together he still makes me laugh and humor can pull you through the tough and good times!
The six things I happy about in my life:
1) my husband
2) my kids
3) my friends
4) Stampin Up
5) my health
6) my brother and sister
Now I need to pass this on to 5 more bloggers:

Friday, February 13, 2009

Boys making teacher Valentines

Okay, I made Valentine's for my son's classmates. He made Valentines cards for his teachers. First, let me prelude it that Karate goal of the week was to have two days electronic free. They don't get to play video games during the school week, but do get some TV downtime. So, my nine year old said "Mom what can we do together?" I suggested we make some valentines for his teachers. He gladly accepted.
1) He picked out the stamps he wanted to use.
2) picked out the paper- I was impressed he picked out pirouette pink to stamp main image on.
3) he stamped and colored in with water color pencils- who doesn't like to color??
4) He assembled it- he love using the snail tape runner.

***I cut the paper for him and did the scallop edge.


Since the base was Chocolate chip, I gave him some vanilla cs to stamp inside too. (Julie-SBS24- would be so happy, she always does so great on decorating everything!)

I might have a future recruit! Just kidding, it's nice that he wanted to spend time with me doing something I like to do.
I think I might institute a one day a week of no TV and find things we can together.

Thursday, February 12, 2009

checkbook covers-Go Fifth Ave Floral

This is my checkbook cover I did about 4 years ago. If you look closely my edges are all cracked and broken. It really needed to be replaced, or it has been on the to do list for about a year since I got new checkbook covers to stamp.


Yesterday, I got my big order! So I quickly mounted my Fifth Avenue Floral set (113734, $24.95) and used inspiration from Manhattan style watch! Style Watch is a section in the beginning of the catalog that gives hot trends and sets, papers and accessories that are all designed to go together.
The colors are baja breeze, night of navy and kiwi kiss. I used one of my favorite ribbons-the satin kiwi! It only took about 10 minutes, but I just needed right set for inspiration!
Now to attack my to other list of projects to complete, but this set makes me want to go make some card and stationary sets!!!
Don't have a new catalog yet? Stampin Up is running a promotion for month of February- if you place an order on-line you will get a catalog sent to you for FREE! That is along with current Sale-a-bration promotion.

Tuesday, February 10, 2009

kids Valentines

Do you think my 3rd grader appreciates me? I spent about 3 hours making valentines for his class vs. spending about 15 minutes going to the store to buy them. I have a room full of stuff, why would I buy them? I don't buy cards, I make them!
When I am old and gray will he take care me, because I made valentines every year for his class? Probably not the main reason, hopefully I have been a good enough mom besides my crafty side! So, this is all 27 valentines. I had to force myself to keep it simple, after all the airhead is the most appealing thing on the card. tip: I used glue dots to hold them onto the cardstock.


Close up:

card recipe:

stamps: Just Jawing (sorry Mackenzie made me buy with all the cute stuff she did with it)

ink: basic black, real red marker, real red classic ink

paper: kraft, whisper white

accessories: dazzling diamonds

** tip- I just used my scissors to make the banner. By using your fingers/fingernails and running it over cardstock in both directions you can break down the fibers to make it bend and then I used dimensionals to attach.


I am going to have him sign return address labels to just stick on the back of card.


Monday, February 9, 2009

Ghirardelli box

SBS 24 challenge this week was to do a love theme- What is more love themed than Chocolate?

I saw Beate's tutorial on SCS 1.5 weeks ago. Since it took just a small piece (4 -1/4 x 8), I had a one sheet wonder left over using new SAB set polka dot punches so I thought I would play along. I did not have an Ghirardelli chocolates (doesn't stay long in this home) but had some Russell Stover ones. They are double layered so only could get 2 in vs. the 4 for Ghiradelli chocolates.
This is the box closed.


Saturday, February 7, 2009

scrapbook Saturday

Remember last week, I tried to scrapbook some sledding pictures but ended up with a card? Well, I went to my upline Erica's house on Wednesday. She is a fantastically talented scrapbooker, so I just cased her two layouts! Yeah- mission accomplished, almost- I still need to add some rubon to not quite navy layout! It is tough to see from photo but I also used some sissix die snowflakes with dazzling diamonds.


Do you ever wonder what to do with all your creations or swaps? There are many organizations that can use them. I usually make my old swaps into cards for Ronald McDonald House.
But I am passing along some information in regards to Chemo Angels- they are in desperate need for some volunteers. I am a card angel, I send a card to my patient once a week and sometimes a small gift to lift their spirits. A chemo angel sends small gifts once a week, but with the economy these volunteers have dropped off. If you are interested in being either a card or chemo angel check out http://www.chemoangel.net or http://www.chemoangel.com
On the same line of giving- a shout out the the third grade brownie troop who I worked with to make cards for the troops. We donated them to cardsforheros.org

Thursday, February 5, 2009

split negative tutorial

SBS 24 Challenge this week was to do masculine card. My old standby- to use Lovely as a tree. I had this idea in my head, but not time to execute it earlier in the week. I tried to use some sage shadow as I always seem to use earth tones for masculine cards, I thought it would jazz it up a bit. Then I got my new texured plates for my big shot this week and decided I needed to break them in.


Here is a close up of the cardstock I ran through my big shot using one of my textured plates. I then sponged some chocolate chip over the raised image to bring out the embossing more.


Quick Split negative tutorial:


1) stamp images

a) one on neutral cardstock in dark pigment ink. here I used very vanilla and chocolate chip craft ink. I then used clear embossing powder and heat set.

b) the other one on darker cardstock and use white or clear embossing powder. my sample is on sage shadow with white embossing powder.

tip- make sure you find center point of your stamp so

you are able to stamp both images equally. I used my grid paper for help.


2) cut both pieces of cardstock in half. my cs was 3 x 3, so I cut it at 1.5 ".


3) matt your cs pieces on darker cardstock with 1/8" border.
I like to put some scotch tape behind my images to help keep them together so I can mount evenly. You will now have two images available to make two cards!


Monday, February 2, 2009

celebrate good times.....


In the famous words of Kool and the gang, "celebrate good times come on...." Now you will have that song in your head all day...

Sale-a-bration started yesterday at Stampin Up and now through March 31st when you spend $50 you can earn one of the exclusive SAB sets. No limits!

But wait there is more...


1) Recruits- Have you ever thought about becoming a Stampin Up demonstrator? There is a 15 % off the starter kit and a $339 value is only $169. Plus, you can get any set ($47.95) FREE if you sign on during Sale-a-bration. contact me to join my team!


2) hostess- if you host during SAB and have a $300 workshop you get a SAB set FREE in addition to other hostess benefits.

Okay, want to see some cute projects with some SAB sets? We made these at our demo meeting last week. I can't not take credit for these, our wonderful leader Amy Czuba had all of these for our make and takes!


This one features "yummy set". The card is done with the top note die on bigshot. Except you keep fold down under the die cut line so you get the shape but keep your fold. We covered it with some of the candy lane dsp cut out with top note die. Love the touch of flower over "i".


This is the "botanical blooms set". This has to be my favorite set- I love 2 step stamping!
This card is 3 x 6 and done on the textured paper with the middle flower cut out and put on dimensional! So many possibilities with this set.
I hope you have the song in your head now...
We had a wonderful day here, it was Sunny and in the 40's, you think it was Spring. Of course we are getting snow tomorrow, but the extra 20 degrees felt like the Caribbean.